[Video] How To Install A SRAM AXS Upgrade Kit
![[Video] How To Install A SRAM AXS Upgrade Kit - Thunder Mountain Bikes](http://thundermountainbikes.com/cdn/shop/articles/video-how-to-install-a-sram-axs-upgrade-kit-thunder-mountain-bikes.jpg?v=1721281227&width=1600)
In our example, we’re installing a GX Eagle AXS Upgrade Kit onto a new Ibis Ripmo. SRAM also offers their Upgrade Kits in the X01 and XX1 versions. However, these installation steps are the same no matter which Upgrade Kit version you’re installing.
:35 – Unboxing
SRAM’s AXS Upgrade Kits offer a one-box, simple-install solution for upgrading your bike to a wireless drivetrain. SRAM’s Upgrade Kits come with all the components you’ll need, including the derailleur, controller and handlebar clamp, battery, charger, B-tension tool, plus a handy multi-tool that you can put to use during installation.
1:02 - Tools Needed
The tool list, like the overall install, is simple. You’ll only need a 5mm Allen and a T25 to install the derailleur and controller. Plus, you’ll need a chain tool and possibly a chain breaker if you need to resize your chain or install a new one.
1:09 – Install Derailleur

Before you get to this step, you’ll want to remove your existing chain and derailleur unless you’re building from a new frame. You can also apply a dab of grease to the derailleur threads before mounting to ensure longevity. Then, with a 5mm Allen wrench, install the AXS derailleur to the hanger. Ensure the B-Tension tab is between the derailleur hanger and the B-Tension screw as you’re tightening it into place. Tighten until hand-tight. We find that locking out the derailleur clutch in its bottom position makes the next steps easier.
1:30 – Install Controller

Whether you use the included handlebar clamp or have an integrated mount like our example bike, installing the controller is as simple as hand tightening it on with your T25 wrench. Some riders find SRAM’s controller paddles to need slightly different placement than their previous shifters. You should check your new controller placement with your grip at this step. (It’s much easier to make adjustments here while your bike is on a stand vs. when you’re out on the trail and missing shifts!)
1:45 – Install Battery

As with all electronics, it’s a good idea to get a full charge on the battery before you install it into the derailleur for the first time. Before you even start installing the hardware onto your bike, unwrap and plug in your charger and battery. By the time you have your new derailleur and controller in place, your battery should be good to go. Once it’s fully charged, simply remove the red protective battery cover from the derailleur (and/or from the bottom of the dropper post if you’re installing a Reverb dropper post, too), then pop in your battery. You’ll see a green light flash on the derailleur when you connect the battery.
1:59 – Pairing

AXS components rely on Bluetooth to connect to each other, and pairing them takes the press of a couple of buttons! First, press and hold the AXS pairing button on the derailleur until you see the green light begin to flash. Then press and hold the button on the controller until it also blinks with a green light. And again, do the same on the dropper post if you’re connecting in a Reverb. Finally, press the AXS button once more on your derailleur, and you’re set! Test the connection by shifting the controller up and down through gears.
2:30 – Install Chain

We’re using a pre-sized chain for our install, but you may need to adjust the sizing of the chain for yours. If you’re unsure if the chain you have is the correct size, give us a call, and we’ll help you out! Or see SRAM’s chain sizing and installation details in the included install guide or their install video here.
Once your chain is sized, place it on the smallest cassette cog and route it through the derailleur pulleys. Place the other end around the chainring and connect your chain. Now shift up through each gear to check proper shifting and bring it into the second-highest gear setting to prep for the next step.
3:07 – Adjust limit Screws

Adjusting the limit screws is an essential next step to ensure proper derailleur alignment and chain tension. We find it’s easier to adjust the high end of gears first and then the low end.
The adjustment screws are located just behind the battery housing on the derailleur. The screw on the inside of the drivetrain adjusts the high end, and the screw on the outside adjusts the low end.
You’ll use these screws to adjust the alignment of the derailleur cage so that it is in line with the cassette you are tuning and the chain spins smoothly. The derailleur should not fall outside the smallest gear on the cassette, and when set on the largest cog, you should be able to apply physical force to the derailleur without the chain falling into the spokes.
The goal is to make the limits as tight as possible while giving the derailleur enough range to shift smoothly through all 12 gears. It may take a bit of trial and error to achieve perfect adjustment.
3:50 – Adjust B-Tension
Next, you’ll adjust the B-Tension setting with the included guide. To do this, shift your derailleur into the second-largest gear. Then apply the B-Tension adjustment guide to the largest cog right above the top jockey wheel. Make sure to align gear tooth imprints on the guide with the gear teeth on the cog itself.
From here, use the B-Tension screws to add or remove tension until the top jockey wheel is aligned within the target of the B-Tension adjustment guide.
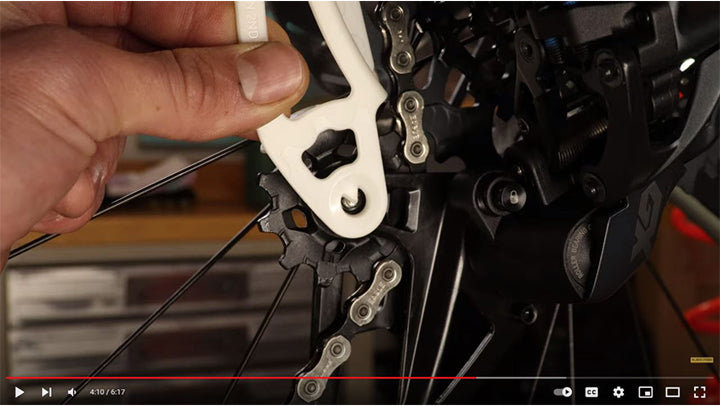
4:13 – Micro-Adjust
The Micro-adjust feature is similar to barrel adjusters found on standard derailleurs. This feature will help you dial-in the chain tension, especially if you’re having trouble getting it to shift into the smallest cog. To micro-adjust your derailleur, press and hold down the AXS button on the controller. While holding the button, click the controller twice in the direction you need to adjust it towards, then repeat if needed to achieve a smooth shift through all gears.
4:46 – SRAM AXS Mobile App Setup

To get the most out of your AXS drivetrain, we recommend installing the SRAM AXS mobile app. You can find it on any app store by searching for “SRAM AXS.” Once installed, open the app and log in to your existing SRAM account or follow the steps to create a new one. You’ll be prompted to add your new AXS components when you’ve logged in. To connect, click “Add to Bike,” then select your derailleur or other AXS-enabled components and follow the prompts in the app to connect each.
5:28 – App Settings
Within the app, you have full control over your Drivetrain Settings and to Configure Controls exactly to your liking. You’ll also be able to check battery life, get firmware updates, and make further micro-adjustments. We love that SRAM has made the app completely optional, and nothing is stopping you from hitting the trails as soon as your gears are aligned (other than the battery level, anyways!) However, we find the app intuitive to use, and anyone who loves a truly dialed-in ride is sure to appreciate the extra control.


